

Safety Note:
Seniors – remember you are responsible for your safety.
Care givers – remember you are responsible for the safety of those in your care. Remain with them while they do any crafts.
Fun Activities That Seniors Can Enjoy
Listed here are a group of crafts from simple to intricate that seniors can enjoy and are updated monthly. They generally require inexpensive materials, most of which are found in the home. These are adult oriented and many are practical.
A few are best done as a team where idea and design planning can include all skill levels. Some are very easy and simple, while others can be elaborate or complex. There should be something for all seniors.
This medium, also called salt dough, is like clay which can be made at home with flour, salt and water. It can be colored with poster paints. Poster paints are easy to find in craft sections of large stores or in craft stores. Each month has a variation to the recipe and recommendations for color. Various methods or suggestions of things to create are offered. Although baker’s clay can air dry, we recommend 3 hours in a 200 degree oven. This art form requires preparation, is very tactile and inspires creativity.
July
Cornstarch Dough
½ cup cornstarch
½ cup all-purpose flour
½ cup fine salt (canning and pickling salt)
½ cup (or less) cool or cold water
Follow mixing instructions below.
This dough is a little whiter than the usual flour dough and also a bit grainer.

Red, white and blue are the suggested colors for the dough this month. (Feel free to make other colors too.)
Ideas for creations:
Blue - flowers (forget-me-nots, bluebells), hats, blue berries, blue bird, car
White - lighthouse, gull, life preserver, sails, stars, astronaut, sailor’s hat, tee shirts, cloud, ghost
Red – fire hydrant, flowers, mushroom, card suits
Small hat idea (with or without a face):
Sailor hat, Dutch girl
Napkin ring (form it around a foil wrapped empty toilet paper roll):
Stars, nautical theme
Project idea:
Plaques: Make plaques for doors, welcome signs, individual letters, seasonal signs, or flat images for wall hangings. Don’t forget to imbed a paperclip on the back to provide a sturdy hook for hanging.
Baker’s Clay
Baker’s clay also called salt dough, or dough craft is a simple clay made of flour, salt and water that can be used to form simple figures, designs or even useful items. The item is made and then dried in an oven for 3 hours at 200 degrees. It can be painted after it is baked (poster paint works better than watercolors) but adding poster paint to create colored doughs is much easier. Separate pieces can be made and glued together after baking. This activity is creative and lets seniors use their hands. The following is the basic recipe with tips. This medium is not permanent, however it can last years, and even longer if it is varnished. Additionally, each month there will be variations to the recipe, project ideas and specific color suggestions with suggested designs.
Basic Instructions
Making the dough
2 cups all-purpose flour
1 cup fine salt (canning and pickling salt)
1 cup (or slightly less) cool water
Mix the dry ingredients; flour and salt together. Make an indentation and pour in half the water, mixing with your hand. Add more water to incorporate all the dry mixture. Once well mixed, scatter some flour on a flat counter or surface and knead the dough until it is a smooth, well mixed ball without any lumps. This should take about 5 minutes. If it sticks to your fingers, sprinkling the dough with flour and continue kneading. If it dries and cracks, add more water.
To add color to the dough, break off the amount you want to color and put in a glass or ceramic bowl. The bowl should be about twice the size of the dough. Make an indentation in the dough, pour a small amount of poster paint into the dough and knead it by pinching and twisting in the bowl. Add more paint and knead in the bowl until the color is incorporated evenly. Paint will add moisture to the dough so you may need to add more flour during this process. Use rubber gloves to prevent the paint from coloring your hands during this kneading. However, the color will wash off.
Wrap tightly in plastic until you are going to use it. It is best used soon after it is made. It can be stored enclosed in plastic wrap, in a sealed container for up to 12 hours in a cool location, but preferably not in the refrigerator.
Preparing to create
Set up a location with aluminum foil squares (6 to 8 inches square) for working on. Aluminum squares make it easy to move the individual item to a cookie sheet for baking. No specific tools are needed but many items can be improvised and used as tools. Use a rolling pin or a dowel to roll out dough. Silver or plastic ware, a pointed instrument, straws, textured items like bottle caps, items that can make texture such as combs can all be useful. Cutting instruments such as a pizza cutter, floss or string, or a plastic lettuce knife can all be used for cutting dough. Cookie cutters are easy shapes to begin with. Additionally, cardboard cutouts can be prepared if your seniors need this type of help or you are making many uniform pieces.
Useful items while creating are two sheets of wax paper to use under and over the dough when rolling out, a small (2-ounce) spray bottle of water and paper towels. The water spray can smooth the clay and help attach clay to clay to form a bond. It can also clean off hands between colors or when they get crusted over.
Creating
Use aluminum foil to create a core for larger pieces. Crumple the foil and press dough around it. The aluminum will remain inside and help it bake. When joining pieces use water on your fingertip, or from the small spray bottle.
This dough is a very thick liquid and will try to return to a blob until it is cured (by heat or naturally dries out). Therefore exaggerate all details on it. You may also use a prop such as an aluminum foil cradle or an upturned bowl to hold up an upright item or for an extension. Remember the prop should be oven safe even though it will be at a low temperature. Anything over 2 inches tall should be propped up or laid down to prevent it from leaning over. Never use any plastics (Styrofoam egg cartons, etc.) that will be used in the oven as they often release toxic fumes and may melt.
Generally, items made from 1 to 3 inches work the best. Smaller are difficult to shape and bake, larger tend to crack over time. If making a larger item, it is less likely to crack if it is flat.
To prepare for hanging, bake a wire in it (a paperclip works well) or make holes (a drinking straw cuts a clear hole) to allow for a ribbon or fishing line.
After creating
Put all the pieces on aluminum foil squares on top of an aluminum foil wrapped cookie sheet which will protect the pan from the salt. Bake 3 hours at 200 degrees. After the first hour use oven mitts and a spatula to carefully turn the pieces by removing the aluminum foil squares so the bottom of the pieces can dry. Not all of the pieces will be firm yet so be gentle. Some larger creations may need to wait longer to be turned.
At three hours, check if everything is dry. Thick pieces may need more time. You will know if they are dry by the change in color. If you are unsure, tap them with your fingernail. There is a difference in sound when the pieces are dry. If they are dry, it is preferable to turn off the oven but leave them in it to let them cool down slowly. Even if they are not finished, they can be removed and will continue to dry at room temperature. For truer colors let them air dry or cover the surface with aluminum before baking. If you covering them with aluminum they will need longer drying times. Baker’s clay can air dry or sun dry but it will take 2 days for every ⅛ inch of thickness of dough. Baking times will vary with the density of your piece. (If you need to use the oven, remove them and return them to the oven later to finish.)
If you wish to paint them, let them dry for at least a day after being in the oven. Use poster paint. Water color paints do not work as well as the water soaks into the clay. Projects can be left in their natural color. To make them long lasting and protect them from water or humidity thoroughly coated with a non-water based varnish. Small pieces can be brushed with clear fingernail polish. Never use for food as they will disintegrate if washed unless varnished.
If you need to attach or repair dried dough use white school glue. A replacement part can be made and stuck directly to the dried piece. Then let it air dry. To just attach pieces or assemble a project, use hot glue from a glue gun. Always use caution using a hot glue gun.
Some General Creative Ideas and Suggestions
- Make shoes, face or hat for a magnet or a pin
- Make a plaque or letters
- Make a frame
- Make an ornament
- Make a nativity set
- Use props (can, toilet paper roll, aluminum foil, card board, glass bowl, cupcake flutes, etc.)
- Make jewelry (rings will shrink in size, exaggerate holes in beads as they will shrink, also keep them threaded on a skewer, at least until they slightly dry)
- Make a wreath
- Use a garlic press, sieve or a potato ricer to create hair, fur, or a nest
- Use cookie cutters
- Use indelible ink to add details (eyes, teeth, etc.)
- Add embellishments before baking (clean feathers, seeds, sticks, dried flowers, cloves, etc.) or glue to them after
- Use texture such a knit (like a sock), ribbed (lipstick cap), cabbage, buttons, etc.
- Make a napkin ring around an empty toilet paper roll wrapped in foil
- Create a lid for a small terra cotta pot by covering it with foil and putting the dough on top but it needs to be loose over the sides as it will contract while drying
- Create pieces to assemble after drying (out house, box, tissue box, bouquet, pinecone, petals, etc.)
This “craft” is free-form. It is simply a small scene interpreted from a given theme and created in a shoebox. Use cardboard shoe boxes. If you do not have one (or need many) ask at shoe stores. They often have extras. You can use a small cardboard box instead or even make an appropriate sized box. It simply needs to have one side open to showcase the scene.
This activity requires planning. An individual can plan and assemble a diorama by themselves, one person can plan and prepare for a group or a group can plan one diorama to be assembled.
July
Theme: Numbers/math/science
Ideas: Computer punch cards, abacus, pencils, flash cards, Bunsen burner, calculator, etc.
Although expected at Easter, this craft can be done all year with creative results. We recommend that the eggs be blown: see instructions. This allows the egg to be used and the shell to be kept. The dyes are simple and from the kitchen, except at Easter when commercial dyes are easily available. There are two components: the dyeing and crafts using egg shells. Each require different levels of abilities and skills. Choose the project by the abilities of the seniors.
July
Dyeing
Using food colors, dye the blown egg red and blue. Use thin strips of scotch tape around the bottom before submerging half of the egg in the red food coloring…..

Egg Project
To create a decoupaged egg, you will need a blown egg, a colored or decorated paper napkin. Cut the napkin into ½ inch to 1 inch squares, triangles, rectangles, etc. Try to cut out whole parts, i.e. birds or flowers. Save the scraps as they will be useful to fill in. You will also need a small dish with white school glue, a small paint brush, a little glass of water and an empty toilet paper roll to gently hold the egg while it is drying. Collect a couple paper towels (most dry, one or more damp) and a surface to work on (vinyl or newspaper). Spread some glue on the dish for easy access. Paint a spot of glue on the egg and add a piece of tissue. Use glue and “paint” the piece flat. Repeat with another piece of tissue. Overlap the pieces to completely cover the egg, however cover ½ the egg and let dry on the toilet paper roll before finishing the second half. (You may use other types of papers such as newspaper, gift wrap, specialty papers, etc.)
Egg Decorating
Today, eggs are often decorated at Easter time. There are traditions of decorating eggs that date back to early Egypt. Eastern Europeans decorate eggs with elaborate designs using wax. Even Faberge, the royal jeweler of the Czars imitated decorated eggs, creating ornate jeweled eggs.
By blowing the contents of the egg out of its shell, both the edible part and the shell can be used. Each month we will give two projects for decorating eggs. There will be a dyeing project which will use ordinary foods and spices, a few of which will need to be boiled on the stove so a kitchen is required. It is a basic project and will take little skill and can even be done as a demonstration. The second project is more of a variety of craft projects using eggs. These will vary in skill levels.
Basic Instructions
How to blow the egg out of the shell
- Raw egg in shell
- Clean push pin
- New toothpick
- Bowl or container to keep scrambled egg until used (preferably soon or they can be frozen)
- Paper towel on which to set pin and toothpick
(optional: small scissors, basting bulb, straw, kit from craft store – see below)
Note: This process requires a good amount of breath. If your breathing is difficult or shallow, use an alternate method - see #5.
- Wash egg with soap and dry it. (You will be touching it with your lips.)
- Use a clean push pin to carefully poke a hole in the top, the pointier end. (Although not required, for ease of extraction enlarge this hole a little.)
- Covering the top hole with your finger, use the push pin to poke a hole in the bottom. Then with the pin, gently break away enough of the shell so that the egg can come out and into the bowl or container. Make the hole between ½ the diameter to the whole diameter of a pen or pencil. Avoid getting any shell in with the egg.
- While still inverted, use a clean toothpick to poke inside and break the yolk. Move the toothpick around in the egg to break it up a little while covering the top hole – now underneath.
- Over a bowl or container, put the large hole and blow in the small top hole. The egg will be forced out the bottom. This will take some time and you may need to coax the egg out with the toothpick. (A simple alternate to blowing is to use the bulb of a turkey baster. Being gentle, place the bulb on top, over the small hole. Squeeze, remove bulb from egg to allow air in, release baster, place over hole again and repeat. The baster will be equal to short breaths so you will need to squeeze multiple times.)
- Once the egg is removed, wash the interior by running water into the egg, shaking it around and then letting it drain or blowing it out. It can also be submerged in a bowl of water, drained and then dried.
(When planning a recipe, blow out the egg before beginning your recipe as blowing out an egg is slower than cracking it.)
There are alternatives to putting your lips on the eggs and blowing such as a baster bulb, an egg blower from a craft store or a clean ear wax remover.
There is also an alternative to two holes. Create a larger hole on the bottom and use a straw poked up inside to blow air in. Bend the straw to avoid the raw egg from touching your face. Let the egg come out the same hole around the straw.
Drying the dyed egg
A simple drying holder is half an empty toilet paper tube. When drying remember that liquid will drain out both after washing and dyeing. I put a ½ toilet paper roll upright on a glass dish. Water or dye will likely seep through the toilet paper tube. Be particularly careful with dye. A more elaborate drying rack can be made with Styrofoam and bits of wire.
Displaying
A simple stand can be made from a napkin ring, a candle holder or an egg cup. A couple of strands of cotton string or yarn mixed with white school glue can also make a simple stand (see Yarn in Glue for more details). A “nest” can be made from colored bakers clay pressed through a garlic press and baked (see Baker’s Clay for more details). A small strip of green craft foam sheet snipped and wrapped around the base can look like grass. A piece of felt folded and glued with a small hole cut out of the center also works. You can even glue the egg to the top of a thin dowel and anchor in a potted plant. They can be strung and hung. Hang eggs on a branch propped up as a tree to display.
How to hang – make a needle by folding in half a small wire, like florist wire, and carefully thread it through egg. Slip the thread or ribbon in the end that is poked through and draw back through the egg. Make a knot or glue a blob that will go through the first hole but not the smaller one on top. A large bead can also be threaded through the top portion of the thread or ribbon and glued to protect the top hole from cracking. An individual hole protector such as used with three ring binder paper can also protect the shell at the hole.
Glue ribbons to the egg in a variety of ways to create a method of hanging.
Felt is a medium that is easy to use, is relatively inexpensive, widely available and comes in many colors. It can be purchased by the yard or in smaller sheets, often 9 by 12, and can be found online or at stores that sell craft supplies. Acrylic felt is much cheaper than wool. Each month there will be three projects.
►The first project is a tissue box cover, for either a square or a rectangular box.
►The second project called landscape is a theme for a picture made by cutting and layering felt. I recommend it be only 9 by 12 inches picture. Photograph the final picture or display them at an angle. They should not fall apart if gently handled. Recycle the large pieces of the landscape for the next felt activity.
►The last project is button embellishments. These are generally small decorations that are to attach to buttons and be worn. This is a way to add color and seasonal creativity to clothing. Some embellishments are duplicated down the shirt, others are different for each button. Some are even beyond the buttonholes.
July

Tissue box: Fish tank
Box: rectangular
Felt: light blue and various colors
Tips: Cover the box in the light blue. Add fish, plants and other items like a treasure, a scuba diver, etc. Glue with school glue. Place plastic wrap on the glued felt and weight it down with a book.

Landscape idea: Island in a lake or river

Button Embellishment: Uncle Sam's hat and firecrackers
Felt: Red, white and blue
Instructions: You will need twist ties (white for the fuses if you have them), school glue, plastic wrap and some thin cardboard. Make a pattern of a hat on a piece of paper. Draw in onto the cardboard and cut it out. Use the cardboard as a template to cut out felt to cover the hat. Carefully cut out two holes, a single hole punch works well. Thread one twist tie through so both ends are on the back side of the hat. Use school glue to attach the felt to the cardboard. Place on and cover with plastic wrap and weight with a book to make sure it is anchored well. Cut out and add other colors to make the image and repeat the gluing process.
For the firecrackers, cut a square or rectangle out of cardboard. Carefully cut holes and thread one twist tie through so both ends are on the back side of the firecrackers. The holes should be above the middle so that the image will hang down and not try to twist. Cut an odd number of straws cut to an appropriate length (2 to 2 1/ inches). I cut small holes and threaded one white twist tie through to be the fuse for two and one white twist tie with the half hidden under the felt. Cut out a piece of red felt that is longer than the cardboard. Space apart and glue the straws to the cardboard and the weave the felt over the straws. Place plastic wrap on top and use pencils to separate and space the straws. Weight with a book that will not crush the straws.
Creating with Felt Fabric
Felt is a simple medium that is very easy to use. It can be made from a synthetic which is very inexpensive or a wool which is expensive. Use synthetic felt for following projects.
This project is a seasonal tissue box cover. These require felt, cardboard, glue and either a square tissue box or a rectangular box. This is relatively simple and requires following a simple design.
Tissue Box Cover
General instructions
Most of these projects require a 12 oz. cold cereal box (for thin but sturdy cardboard), white school glue, scissors and felt.
Open the cereal box flat and cut down a corner. Using one of the folds as a base line, draw a design on the cardboard. For a rectangular tissue box, the base line should be from the side of the box. For a square tissue box, use the bottom or top. (Most designs are helped by keeping a folded flap for stability, so orient the design to the folded edge, either top/bottom or side.) Cut out the design (retaining the fold if needed).
To cover the tissue box, use a piece of felt 5 ½ by 28 ½ for a rectangular box and a piece of felt 7 by 19 inches for a square box. (Measure your own box as boxes vary in size, particularly rectangular boxes in height.) Line one long edge to the bottom of the box and wrap the felt around it leaving the extra felt at the top. Using a small amount of tape, tape the felt to the box. This will just help keep it in place for the gluing. (Note the direction of the oval hole on top of the box as related to the design.) Overlap the felt and glue the seam – this will be the back which will be glued to the design. This will need to dry so weight it slightly with a book. (I place a plain sheet of paper between the book and the project to protect the book, just in case.) When dried, fold the top flaps down like you are wrapping a gift box, and glue. Glue the two interior areas of the flaps per corner, i.e. glue felt to felt, not to the box. Again, weight and let dry. Once dry, cut the extra felt out of the hole area to access the tissues. (I use the extra perforated cardboard piece that was removed as a template.)
If attaching a tall back design, glue the covered box to it, weight it and let it dry.
Additionally, cover the back if the box will be seen from the back side.
When using white felt on the kraft cardboard, I usually first glue a sheet of white paper to the carboard to make the white seem brighter.
Landscape
General instructions
This project is about making a 9 by 12 inch picture with felt on felt. Felt rectangles can be purchased that are 9 by 12, but felt is cheaper when purchased from the bolt. Highlight colors are often only available by the piece. Begin with one color for a base and add cut out pieces of felt to create the desired picture.
Button Embellishments
General instructions
This project creates pin like embellishment that can be attached to buttons or buttonholes. This uses felt, thin cardboard, school glue and twist ties. A single hole punch is useful but not required. Make the suggested design on paper and transfer to cardboard. Cut two holes and thread the twist tie so the ends are on the back side. Cut out the shape in felt and glue to the cardboard. Add more layers if required. Safety pins can be used instead of twist ties.
This project is a simple painting project using poster paint and a 6 inch terra cotta saucer as a ‘canvas.’ The idea is to follow one of two general themes provided. Additionally, there is a novelty suggestion. There are instructions on how to make a simple easel using an empty cereal box. Practice designs on squares of paper grocery bags. Then repeat the best design on the saucer. (There are optional ‘canvases’ suggested, i.e. bakers clay tiles and others.) This requires some mastery with a paint brush and may be difficult for seniors with poor dexterity.
July
Theme: Wild west
Ideas: Cowboys, masked outlaw, hat, bandana, holster, horseshoe, cow, horse, campfire, lasso, gloves, boots, sheriff badge, cards, wagon wheel, spurs, barbed wire, cactus, sombrero, mountains, mesas, fence, wagon, etc.
Alternate theme: Patriotic
Ideas: Bell, stars, fireworks, tri corner hat, stars and stripes, flag, etc.
Novelty: Paint an outline and then make the interior plaid by using masking tape.
Painting
This activity is painting with poster paints on terra cotta pot saucers. The saucers are relatively small (about 6 inches). (Real terra cotta tiles have a finish on them which prevents poster paints from sticking to them.) The idea is to take a theme, practice and then paint on the actual terra cotta saucer. Listed below are some alternates to the terra cotta saucer.
Basic equipment
1 saucer per person
A simple easel (to make, see instructions below)
Practice sheets (cut a brown paper grocery bag into 6 inch squares)
Small to medium paint brushes
Poster paints
A plate to use as a palette or clean juice bottle caps for individual colors
Water in a glass or dish to wash paint brushes.
To make an easel
Use caution when cutting the box. Scissors or a utility knife can be used.
Use a closed, empty cold cereal box to make an easel. On one skinny side, measure up from the base about 2½ inches and make a line across. On the front and back of the box make a dot 2 inches up and ¾ of an inch away from the side marked with the 2 ½ inch line. Draw a line at an angle from the dot to the edge where you made the 2 ½ inch mark. Next, on the other skinny side, make a line across 9 inches from the bottom. From the side corner 9 inches up, draw a line to the dot on the front and on the back of the box. Cut down both the edges or corners from the top of the box to the 9 inch line and cut across the skinny side. On the other side, cut down the edges or corners to the 2 ½ inch line and cut across the skinny side. Next, make a short cut from the 2 ½ inch line down at an angle to the dot on both the front and the back. Following your line, cut from the 9 inch height to the dot. Repeat on the other side.
Terra Cotta Saucer Alternates
There are simple alternates to the terra cotta saucers. Three different mediums can be made at home and created into tiles. All require time to bake. The first two are varieties of Baker’s Clay. The last is very white and is made from baking soda and cornstarch which will over time, likely react to metals.
Additionally, I recommend making these 3 inches square which is smaller than the 6 inch saucer. A larger tile is easier to break and if thicker, may bubble.
To make Baker’s Clay:
1 cup all-purpose flour
½ cup fine salt (canning and pickling salt)
½ cup (or slightly less) cool water
An alternate:
½ cup cornstarch
½ cup all-purpose flour
½ cup fine salt (canning and pickling salt)
½ cup (or less) cool or cold water
Mix the dry ingredients; flour (or flour and cornstarch) and salt together. Make an indentation and pour in half the water, mixing with your hand. Add more water to incorporate all the dry mixture. Once well mixed, scatter some flour on a flat counter or surface and knead the dough until it is a smooth, well mixed ball without any lumps. This should take about 5 minutes. If it sticks to your fingers, sprinkling the dough with flour and continue kneading. If it dries and cracks, add more water.
Roll out dough with a rolling pin on floured surface to a thickness of a ¼ of an inch thick. Flour to keep it from sticking. Cut into 3 inch squares and carefully place on a piece of aluminum foil on a baking sheet and bake for 3 hours at 200 degrees. Carefully turn them over when you remove them from the oven. Instead of baking, they can be air dried for 3 days.
The dough can be wrapped tightly in plastic until you use it. It is best used soon after it is made. It can be stored enclosed in plastic wrap, in a sealed container for up to 12 hours in a cool location, but preferably not in the refrigerator.
Cornstarch and Soda dough
Warning: because of the soda in this dough, it will react with metal. Use parchment paper instead of aluminum foil to work on and bake on. Also consider where the piece will eventually be used.
½ cup corn starch
1 cup baking soda
¾ cup cold water
Note: To make, this dough requires a stove and sauce pan.
Put the 3 ingredients in a sauce pan and stir over low to medium heat until the mixture becomes a dough. This will take about 5 to 15 minutes. Stir continually and monitor during this time. Move to a glass or plastic bowl. Cover with a damp paper towel and allow to cool before using. Store in a cool location or in the refrigerator.
It is very grainy and does not act like dough. It is difficult to get and keep it smooth as it shows any indentation. It is very moist and does not roll out well but can be patted flat and then smoothed with a rolling pin. Create 3 inch squares on a piece of parchment paper. Move the parchment paper with the dough on it carefully place on a baking sheet. Bake at 200 for 3 hours. It tends to crumble so be gentle. There will also be no noticeable change in color when dry. Instead of baking, they too can be air dried for 3 days.
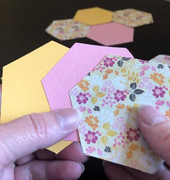
This is the simplest of the crafts. Many seniors have been quilters or have memories of family members who quilted. This requires colorful papers (at least 2 pages of different colors however more are better) cut into simple patterns to be laid out in any design on a flat surface. We recommend scrapbook pages which can be purchased individually or in books and are found in craft sections of large stores or in craft stores. Monthly, we make suggestions for colors, patterns on the pages and the patterns to cut out. This can simply be a repetitive activity for those with memory loss, or an elaborate design created by seniors who are very clear.
July
Paper colors and pattern are:
- Bright: red
- Pale: white
- Other: blue
- Pattern: bandana
Shape: triangle – 90, 45, 45 degrees, 3 by 3 by 4 ¼ inches. Make 3 inch squares and cut in half diagonally.
Note: Make a pinwheel design.
Paper Quilts
Quilts have been a part of America since its inception. Initially, they were created to recycle good fabric which had taken effort to make or cost to acquire. Later they were designed to showcase creative designs, sewing skill and use valuable fabric scraps. Often they were an excuse to be productive while sharing comradery in communities where getting together required effort. Recently, with fabric being so readily available, they showcase the design and the skill of the quilter.
There are many wonderful, simple patterns for quilt pieces that can easily be replicated in paper. This project lets seniors design paper quilts using the beautiful patterns and colors of papers that are available today. Seniors can be creative with the design and active with their hands. Cut the patterns out of a couple contrasting colors or patterns. Then let the seniors lay them out on a table or flat surface to make a quilt design. An alternate to a table is a foam core board which is relatively inexpensive and works well to make a firm, flat, background, however it tends to be slick and pieces can easily fall off.
We recommend using scrapbook pages (12 by 12 inches) which are available at most craft stores singly or in books. I recommend 3 scrapbook pages per person (i.e. 1 page of each of the 3 colors). Old wallpaper sample books may work too but may curl. Choose a firm paper which makes the individual pieces easier to hold and lay out. Some scrapbook pages are even double sided which doubles the pattern options.
When choosing papers for patterns select papers that have contrast such as dark and light, shiny and matte, busy and solid. They make a clearer design – particularly for those with vision difficulties.
Print out the template and cut out the pieces. There are simple paper cutters available, but scissors can be used too. Use a zip top bag or envelopes to store the pieces. Combining different piece shapes and colors from different months can create unusual new quilt designs.
When laying out, let each senior be creative. Some will want each piece to be in a proper spot and an exact relationship to other pieces. Others will leave gaps or overlap pieces which may be intentional and dynamic. There is no “wrong” way to lay out this quilt, even if the original page of paper is reassembled. If keeping the laid-out pattern aligned is difficult use pencil lines as guides or elastic ribbon to anchor them.
To use a table with a quilt design laid out, carefully place a clear vinyl tablecloth over it. To keep a quilt design more permanently, use a glue stick or short pins to anchor the pieces to a foam core board. Then cover the edges with a ribbon and hang the finished quilt on the wall.
This craft is simple but can be messy. It requires yarn or string (preferably cotton), white school glue and usually school construction paper. If there is only white yarn or string, the glue can be colored with poster paints which are easy to find in craft sections of large stores or in craft stores. This is very tactile and requires little skill or creativity.
July
On a dark piece of paper, use many short pieces of string to make an open fireworks design. Make one white, one red and one blue.
Alternate: This technique works also as a flower such as a chrysanthemum.
Glued Yarn Drawing
This activity has seniors creating designs with their fingers using string that is saturated with glue and laid out on a piece of stiff paper or another medium. This requires string or yarn (preferably cotton), white school glue, and a thick sheet of paper to mount the art work. It is messy as the yarn or string is soaked with the glue and then squeezed with fingers. Solid colored scrapbook single pages, 12 inch by 12 inch work well and can be bought individually or in pads.
Set up
- Yarn or string (cotton is best)
- Scissors
- A small bowl of white school glue (big enough to dip fingers in and out easily)
- Water to thin the glue
- Heavy paper to mount the art work (card stock)
- Paper towels to clean fingers, both damp and dry
- Optional - Poster paint or food coloring for glue (colored yarn is much simpler)
Preparing
Set up a location at a table that will be easy to clean up. Lay out newspaper or a plastic bag. Assemble the yarn or string, paper to mount the designs, scissors and cleaning supplies. A finger bowl of clean water and both damp and dry paper towels are recommended. For each person, put a small amount of glue (about 4 tablespoons) in a small bowl. Add a fourth amount of water (about 1 tablespoon).
If you are using white yarn or string and want to add a color, mix a little poster paint or food coloring into the glue before adding the water. All colors will be more pastel than the original since the glue will blend in. (This will make a messier paper as the colored glue drops will not disappear like white glue does.)
Creating
Cut a length of string desired. The entire length will be dipped in the glue unless the design requires a loose end. The yarn or string should be dragged through or the entire length submerged. Lightly squeeze as it is removed from the glue. If the glue drips on the paper (and it probably will) blot it up with a paper towel. It will dry clear unless color has been added to the glue. Create your design. Curls, swirls and straight lines work well. Cursive writing is also fairly easy. After, let dry flat for about a day.
After drying
These can be posted or made into cards (protect the artwork if it is to be mailed.)
Some General Creative Ideas and Suggestions
- Cursive works well
- Unravel some yarn and leave it free of glue (an animal tail, unraveling face, kite tail, etc.)
- Use shapes (fingers, cookie cutters or cut out shapes) to use as a guide for the string
- Cut short or long pieces
- Wrap items (pens, boxes, terra cotta pots, etc.)
- Combine with paper cut outs attached before or after (pocket, angel, umbrella, etc.)
- Combine with drawings to trace or lay over with yarn or string (eyes, lace, or pictures from a magazine)
- Draw details after as a decoration or part of a design (faces for hair or mustache designs)
- Make a 3 dimensional design using a prop (can, aluminum foil, balloon etc.)
- Plastic wrap will prevent glue sticking to a surface.
- School glue is water soluble. If you need to remove the glued string, use a damp cotton tipped stick.